Why “Elongation” Matters In A Console Tape

ruler for measuring console tapeWe’ve wriiten about console tape specs before, explaining why terms like “adhesion to steel” and “flatback” matter when evaluating a console tape.

Another specification that deserves attention is the term “elongation”.

Elongation is a fancy word to describe, in quantifiable terms, how “stretchy” a tape is.  Does it stay the same length and width when force is applied to the ends or the sides.

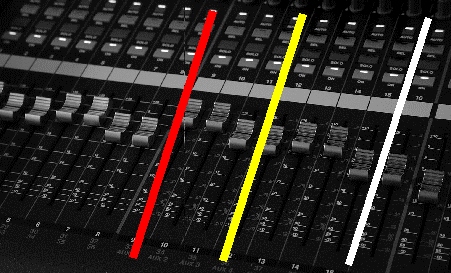
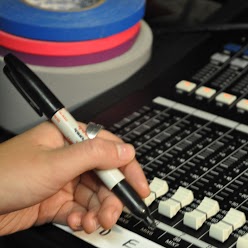
This is particularly important in a festival or other multi-act performance where the sound person will create a separate strip of console tape for each act during sound checks and then put the appropriate tape back on the console when that act is set to perform.  Not only will the tape have the name of what each console channel is used for, but it may well have lots of other information like levels, eq and limiter settings and notes that are relevant only to that performer.

Tape that stretches may well not line up correctly below the console faders, leading the sound person who is quite often working in semi-darkness to apply the information on the tape to the wrong console input.

Shurtape 724 has an elongation spec of 2.5%, meaining that, at maximum, before tearing it will only stretch (elongate) 2.5 %, making it easy to line up on the console without confusion.

Kraft Paper? What Is That?

Shurtape 724 console tape is made from a paper that is formed thru a chemical pulping process. This is where pulped wood (cellulose) is mixed with an acid to create a pulp that can make a stronger paper than other forms of wood pulp.

While the most common type of kraft paper is the one used for making brown paper grocery bags, it can be bleached in order to make it white.

The chemical pulping makes for a stronger and more flexible product which is also more resistant to yellowing.

Unlike “raw” kraft papers, which can be coarse to the touch, 724 is coated so that it is smooth and will not let inks like those used in Sharpie Markers bleed through the tape.

Dry Erase Board Labels? Not Unless You Want To “Wear” Your Mix Home!

DRY ERASE MARKERI came across a discussion recently about mixer labeling on a pro sound forum.  A forum member had asked how other members labeled consoles when there were multiple acts with quick changeover times.

One interesting response came from someone who had applied a piece of dry erase marker board to the label section of his mixer.  At first this seemed like a useful idea, but, on further reading, the person who posted this idea talked about how he had to “train” himself to not rub his hands across the board after it was labeled.  Clearly, this could be a big problem, particularly if you wiped your labels 30 seconds before the set started.

We have a better idea.

Permacel 724 paper label tape has something called “repositionable” adhesive.  It can be removed without leaving residue or tearing and then re-applied to the mixer when the act specific to that label takes the stage.

Like Lines On A Parking Lot

Properly marking a sound console with tape can often mean more than just giving a name to each input with paper labeling tape.

Use of large consoles can also be well served by adding some vertical tape lines between input sections to quickly draw your eye to the section of the console that needs attention.

Since each individual slider may have as many as a dozen vertical knobs associated with it (equalization, aux sends, monitor sends, attenuators, etc.), these vertical lines can make it much easier to quickly go to the set of inputs that you want to work on.

Putting different colored tape stripes between logical input sub groups (vocal, keyboards, drums, etc.) can make the sound person’s job much easier.

Our preference for this is to use very thin gaffers tape (1/2 inch), known as “spike tape” in the theatre.

Flatback? That Just Means “Smooth”

PAPER_PENOne of the descriptive phrases used for console tape is “flatback”.  There are a number of different types of paper tape that are described as flatback, and that phrase can mean different things, based on how the tape is to be used.

When it comes to consolet tape, flatback lets the user know that the tape provides a smooth surface which can easily be written on.  For other users, flatback might mean that the tape can be printed on with a special type of printing press or can be used with specific kinds of ink.

For the sound or lighting tech with a Sharpie Marker in his or her pocket, it just means that writing on flatback tape is like writing on paper.  That’s because it is paper.

Labeling A Personal Mixer? You Might Need Narrower Tape

shurtape p724 from thetapeworks.comPersonal monitor mixers, the ones that allow each performer to do their own monitor mix are popular, in part, because they are small.

Both in terms of how they appear on stage and their portability, the small size makes them a great solution for getting a personal mix just for you.

Because of their small format, they may not have enough space for a strip of regular label tape.

Shurtape 724 is now available in a half inch width, just right for a small format mixer.

Shurtape A&E-that’s “Arts & Entertainment”

label mixer with tape from thetapeworks.comPeriodic re-branding of our favorite console label tape has led to what is now known as Shurtape A&E.

Shurtape acquired the brand Permacel P-724 several years ago and incorporated it into their line of tape products intended for arts and entertainment production.

Shurtape is one of the largest tape manufacturers in the world and their products are prized by hands on techs in film, video, theatre and special event production.

Bring That Sharpie Back From The Dead

sharpie marker from thetapeworks.comMost Sharpie Markers die an early death because you forget to cap them. Without the cap in place, the ink in the felt tip of the marker dries out, preventing the ink still in the barrel from flowing to the tip.

You can bring that marker back to life by dipping it into a dish of warm water. Remove it as soon as it is thoroughly saturated and then blot it on a dry rag or paper towel.

Continue to blot and massage the tip until the water has flowed into the fibers of the tip which will allow the ink to begin to flow back into the dried out tip.

Once the ink is flowing again, make sure to put the tip back on securely.